Mazda MX5 Build Phase 2
Mazda MX5 Build Phase 2
More planning ahead!
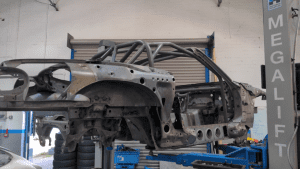
With the cage now 90% installed, we started to plan the layout of the drivetrain and something approaching the final spec.
We now knew we would be running airjacks, so we had to factor that into the chassis, we knew we wanted to run around a 120 litre fuel cell (it is an endurance race car after all!) – add in a chassis mounted front splitter and airdam, rear diffuser and spoiler and we can make good progress with the chassis work prior to paint.
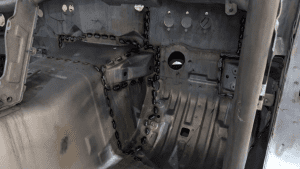
Some areas we knew could be quickly completed without much modification, so these areas were prepped and epoxy primered to protect the bare steel. We had to rework the drivers seat mount to cater for an unusually long driver (!) whilst still maintaining the required regulation ground clearance, as well as clearance to the lower cage that accommodates a hard top.
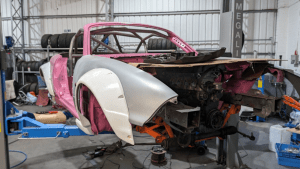
As for the body after its chemical stripping, we had a few areas that needed repair, but as this was a race car we had built some 10 years prior, it hadn’t seen any road use so actually wasn’t too bad.
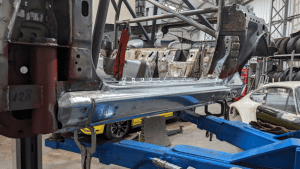
Some inner sill repair work was all that was required as both sills and rear quarters etc were scheduled to be replaced.
New genuine rear quarters and sills were bought, along with the front torque boxes and rear inner arches.
With the shell in bare metal, the entire structure was seam welded – this is where you reinforce the factory spot welds which allow for body flex with intermittent runs of weld, this greatly reduces flex and reinforces the shell.
With the repairs and seam welding complete, the new panels were fitted, inner cavity sections painted and it started to look like a complete car again.
The job of fitting the air jack mounting tubes was next, we fabricated to steel mounting tubes and fitted them to the chassis, not an easy task!
The rears were relatively straightforward, but the fronts took a bit more though.
We couldn’t mount too far forward where we had room, we couldn’t fit them in the cockpit like we would a modern hatchback for example – we had to cut into the strongest part of the shell, the A pillar. Being a convertible, this is an area of huge structural importance. Given we were running a roll cage that would tie into the front suspension, it was less of a concern as we had certainly added in enough strength with that, but we still needed it to be strong enough for a side impact should the worse happen.
With the installation tubes integrated, we could start to modify the front and rear arches to take a new addition – +100mm arches!
These would make the car exceptionally wide compared to a stock MX5, as historically we had always struggled with rear grip, so allowing for a wider tyre would be ideal, it also looks very badass.

We had to temporarily mount an engine, box and diff to modify the tunnel to take a CAE BMW shifter as the customer had opted to run the 6 speed BMW gearbox, and with this done we could make a start on the drivers console position as we also now had a seat in position.
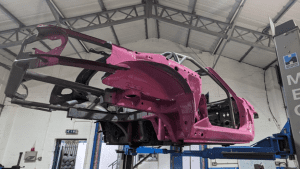
With the panel alignment complete, knowing the shell was still straight was a relief!
We had temporarily reinforced several areas to keep it straight as we had cut so much out of it prior to its dipping. Planning for front mounting of the radiator and intercooler, the fuel tank and rear bracing, and diff cooler are the next stages, as well as finalising the electricals prior to building a bespoke wiring loom for the new ECU, Motorsport ABS and variable traction control.
Next up – finalising the rear end tube work, mounting of the front end cooling, roof mounts and final panel fitting prior to paint!
Watch This Space for Phase 3!


© TrackToys Racing - 2024
